On Day 1, we made the base and top piece for the cake topper, and filled in the lace pattern for the top piece...the hexagon on the right side of the photo will be the base; after these two lines dried, they were filled with flood. The one I am hard at work on, on the left side of the photo, is the one with the pattern. It too will eventually have a similar flood border. The lacework is piped with a royal icing that is strengthened with gum arabic. The idea is that eventually the base will be placed on top of a fondant covered cake, and the top lacy piece will be balanced on sponges, and you attach them by building "legs" of royal icing that harden and hold everything up. That's what we did on Day 2. Then you would decorate the sides of the cake with swags, filigree, and other lovely lacy bits. That's the idea anyway.

Thanks to Marian from Sweetopia for the picture!
So, the thing is...this is a crazy, labour intensive technique, and oh-so-fragile. The royal icing must be just so, and have the proper texture and no bubbles. Jennie had a nifty technique involving clean pantyhose to get the perfectly bubble-less icing into the piping bags. You have to carefully pipe everything so that it will stay together when lifted from the acetate so a lot of care must be taken when piping to ensure that all lines of piping have a meeting place and there are no breaks in your lines. Your piping must be even and steady. (Mine...not so much.) Jenny often pipes two or three toppers when she is making a stringwork cake because just removing the lace from the acetate can shatter it into a million pieces. So in our class, only one person had her most of her filigree topper for day 2. The rest of us got to see first hand how delicate this technique is...Even Jenny's broke.
So here is my "masterpiece" after 2 days (9 hours total) with no filigree inset on the top piece, and only 4 out of 8 swags completed, and some only partially completed at that since I didn't finish the flooding to smooth them out. Only half of the little filigree fleur-de-lys remained intact and could be mounted. A sub-standard snail trail around the cake base.
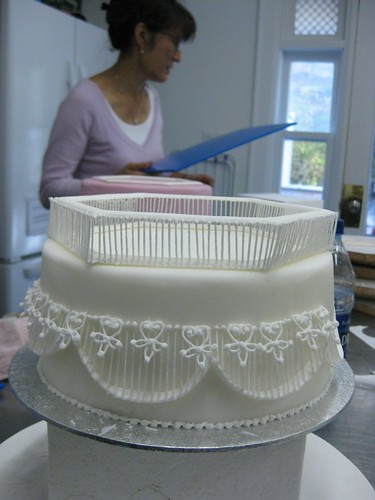
That's Jenny in the background.
All told, this cake didn't last the 30 seconds it took to try and pack it up to take home. The filigree topper shattered, and some of the fleur-de-lys motifs took a header. It definitely wouldn't have survived the bus trip home down Bathurst...It was pretty disappointing, but it was an interesting, albeit frustrating and painful, learning experience. I almost didn't go back after day 1, but I'm glad I did. My hand was so sore after day 2, that I could barely hold my well-earned pint of beer that evening!
2 comments:
Gorgeous!! I'm very glad you captured it on 'film' at the very least.
When I first saw this photos, I thought it was the example that the instructor made - it's that pretty!
so neat!
@loveyourcake
Post a Comment